Little Hello with Pawsome Stamps!

Little Hello with Pawsome Stamps!

So, I found a new stamp company on Instagram – you can follow them @pawsomestamps – they are based out of Florida ☀️ and they have some darling cute stamps!! I couldn’t resist the cactus set & the sea set, plus a bag of sequins in mixed colors! Very pretty sequins!

I got the order the other day (fast shipping! Even included a little note!) I am super busy with my digital art, but I had to try the stamps, naturally. So I used my Karin Markers to color a couple cactus stamps, added some white gel pen, and then stamped on the little faces! (Yes they come with mix & match cute faces!!) Super adorable!

Materials:

  • Prickly Friend Stamp Set – Pawsome Stamps
  • Striped Background Stamp – Altenew
  • Enamel Dots – Altenew
  • Karin Markers
  • White card stock (vertical fold)
  • Pattern card stock
  • Washi Tape
  • Brother Scan & Cut
  • Black ink
  • Foam tape
  • Spray Glue

It never seems like a lot of materials until I write it all down! And I’m probably forgetting something! But the point is the new stamps by Pawsome Stamps 🐾 they are super cute and they stamp very well. High quality stamps. The sequins are also very nice colors and though I did not use them on this card I did use them on another!

I cut the scallop circle 3 times and on the third time I had the Brother Scan & Cut draw the faux stitching for me – you could do this part yourself with a black liner pen of course. I then stacked the circles and adhered them all together.

I have a thing for doing half a card in a decorative card stock and the other side with a background stamp… I know I tend to go this direction often and use washi tape or faux stitching to blend the two sides together. I just like the look of it! I tried to give this one a “southwestern” style but I’m not sure if that worked!

Anyway – the card is below, I think these stamps are indeed “pawsome” and I will definitely be watching their new releases!

The finished card next to the Prickly Friend Stamp set from Pawsome Stamps!
I just love those adorable cactus with the faces!

Thanks for looking ya’ll and have a great rest of your week! ❤️

More Chameleon Fun!

More Chameleon Fun!

Sometimes a design deserves to be repeated! Such is the case with these adorable little chameleons from Pink Ink! One of the cards is for a friend of mine, the other I just decided to make for fun!

Materials:

  • Crisp Dye Inks by Altenew
  • HAPPY Sentiment by Altenew
  • Circle Sentiments by Altenew
  • One in a Chameleon Sentiment by Lawn Fawn
  • Chameleon Stamps by Pink Ink
  • Enamel dots by Altenew
  • Heart Stamps by Simon Says Stamp
  • Black Ink
  • Foam Tape

Ombré inked tiny chameleons on A2 card base with hearts! They are super cute & fun to make in a variety of colors – be sure to pick colors that will blend well where they “meet.” You don’t want to make “mud!”

I adore the circle sentiment stamps by Altenew!
Teal & Lavender make a beautiful mix, as does the parrot & Persian blue!
Adorable and fun cards to make for friends!

And how about some inspiration? I have my very own beautiful chameleons!

Ollie – he’s a beautiful shade of blue in the sun! Nosy Faly Locale
Calypso – a total show off for the ladies!
Love those tails! 🌀

That’s it for now! More to come soon!

Stay Crafty friends! ❤️

Circle Madness!

Circle Madness!

I have a love of circles & halftones so naturally I was drawn to this stencil & stamp set by Altenew! Circle overload? Ah maybe. But that’s ok, it came out as a fun design I think!

Materials –

  • Halftone Circle Stencil – Altenew
  • Trendy Circles Stamp Set – Altenew
  • Crisp Dye Inks – Altenew
  • Rose Gold Embossing Powder

I used the stencil for the background and ink blended the blues shown in the photo to get a gradient.

Gradient halftone background!

I attached it to the front of an A2 card base with foam tape for a bit of depth.

I chose 3 circles from the Trendy Circles Stamp set and embossed with the rose gold embossing powder, I cut them using my Brother Scan & Cut machine. There was a little bit of fussy cutting involved! I attached those with more foam tape, doubling up on the larger circle.

Double the foam tape – double the height!

I then stamped out the sentiment and adhered it so the end was tucked under the bottom circle. All done!

Lots of circle fun to be had!

I love this stamp set & stencil and it will definitely get more use out of me!

Take care and see you soon!

Splash of Color! – an Easy Boutique Card!

Splash of Color! – an Easy Boutique Card!

Hello! Similar to a design I recently did, I’ve gone and done another, why? Because I just love these splash stamps and the simplicity of the leaf design! It’s a fun, quick, easy way to create a card at the end of the day if you are short on time! Many people seem to love simple cards, and I am one of those people! (Now don’t get me wrong I love making complex colored stamp cards and cutting with my Brother Scan & Cut but simple is so fun!)

Materials:

  • Crisp Dye Inks – Altenew
  • Inky Bouquet Stamp Set – Altenew
  • Leaf Clusters Stamp Set – Altenew
  • Painted Rainbow Stamp Set – Altenew
  • A2 Vertical Cut Card
  • Sentiment Stamp – Altenew
  • Black Versafine Ink

And that’s it! Though it sounds like a lot more than it is…it’s a simple design that can be modified to suit what you have I think! Of course you can also make those pretty colorful splashes of color with watercolor on watercolor card stock, or draw them with markers!

The color combinations can be endless as well as the sentiment! Experiment with different leaf stamps & splashes of color!

I am really loving playing with these stamps and I find myself reaching for them especially when I am crunched for time and just want to create something after a long day.

Have fun and stay crafty!

Hello, Eucalyptus

Hello, Eucalyptus

I recently got a stamp set from Simon Says Stamp “Be Kind” it features 3 leaf outlines & some sentiments. I love outline stamps because it saves me the drawing process and I can get right to the coloring process – plus if I mess it up…I can start again easily! Though I do love drawing I don’t always have the time. (I’ve included a picture of the stamp set at the end of this post for anyone who is interested!)

I stamped it using Frayed Burlap Distressed ink. I then painted it using the Lukas Watercolor pan set + extras (like the Lukas gold which I love!)

I cut the painted stamp out with the Brother Scan & Cut, and I also cut a second one in dark green only slightly larger (.08) to adhere behind the original.

I fiddled. A lot. I chose an A2 kraft brown card base. I kept changing the background and adding more ink, finally deciding to emboss with gold in random areas for a “distressed” look. I almost tossed it and started over, but I hate wasting paper!

I embossed a “hello” sentiment from Altenew on white & added a few dew drops.

The end result looks a bit like gold wooden planks. It wasn’t my intention but that’s what I think it looks like!

The inside has a white insert, left blank.

2 rounded corners for interest & style (the second one is out of frame, bottom left!)
I think the painting part was easier than the assembly!

Love the stamp set, will definitely be using it again! It can be colored so many different ways. See below for the exact set!

“Be Kind” Clear Stamp Set from SSS!

That’s it for now! I have a few other cards to post soon!

One in a Chameleon! Card Fun!

One in a Chameleon! Card Fun!

Before we get to the cards…Long story short – We have 9 chameleons. 2 Veiled Chameleons, 7 Panther Chameleons. I love chameleons! They are such amazing animals and it’s like having a bit of the jungle in your home.

So naturally I have a few chameleon stamps in my little collection. I totally forgot I had this tiny cute chameleon by Pink Ink, I found him today and I thought it would be fun to make a couple cards with him (actually he comes with a buddy that is mirrored!) When I first got the stamp set I was focused on the big main stamp and not the little guys. Well I adore them!

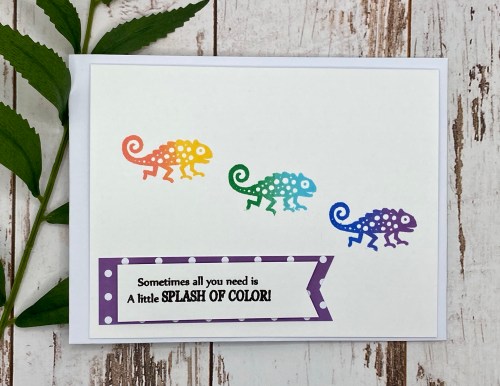
I got them out today and did two simple cards with just stamps & a bit of foam tape. Nothing too fancy, I was going for minimalist. I also love creating fades & ombré looks with inks. I used the Crisp Dye Inks by Altenew for this.

Sometimes all you need is a little splash of color! Sentiment by Altenew.

The second card features the mirrored version of the same chameleon. I think it would make a sweet anniversary card or similar.

You’re one in a chameleon! Sentiment from Lawn Fawn, Crisp Dye Inks from Altenew.

So those were my two chameleon cards of the day. Such a cute stamp!

Here are 2 other chameleon cards I did a few months ago, below:

Stamp from Lawn Fawn, colored with alcohol markers
Stamp by Pink Ink colored with Caran d arche watercolor pencils, background created with Distressed Inks & splatter stamps from Altenew

I guess I’ve been having fun keeping it more simple lately!

Have a great week everyone!

Clean & Simple Boutique Cards AECP Course – with sparkle!

Clean & Simple Boutique Cards AECP Course – with sparkle!

I have a sparkly card to share today! I have been super busy with my 3D shop so I haven’t had a lot of time to craft, but I make sure to find at least a few moments a day to create at least 1 card – even if that means doing more simple type cards that are discussed in the above mentioned course. However – this one was not quite as simple and took me a while to complete!

Before I go any further…if you want to learn how to make simple, pretty, fun, easy cards to give to your friends/family I highly recommend this course! Inspiration comes from everywhere, and you would be surprised how many different cards you can create with just stamps & ink! Link here! https://altenew.com/products/clean-simple-boutique-cards


So onto the card! This card is hot off the crafty table! “Shine like the Stars!” Part of the above course does cover basic foiling – but alas – I do not have foil! I watched the video anyway and decided to substitute with gold glitter embossing powder & sequins! (But tomorrow I think I’ll hit up the Hobby Lobby and see if I can at least find gold/silver foil!)

So I’ll go over the materials I used below:

  • Slimline Card Base (my first ever!)
  • Deep Blue Seas Crisp Dye Inks – Altenew
  • Halftone Stars Stamp Set – Altenew
  • Tiny Stars Stamp Set – Altenew
  • Black Ink
  • Versamark Embossing Ink
  • Gold Glitter Embossing Powder
  • Mixed Sequins

I stamped the larger halftone stars first using the set of inks above to get an ombré effect (I am obsessed with that!) Then I added the smaller stars with embossing ink and embossed those with the gold sparkly glitter embossing powder. Next I added the tiny stars in different areas around the edges, and finally I topped it off with a few sequins. I added the “Shine like the Stars” sentiment at the very end.

That’s it for now – maybe more to share tomorrow! Stay crafty! ⭐️

May Your Coffee Be Strong…AECP Boutique Card (again!)

May Your Coffee Be Strong…AECP Boutique Card (again!)

I seem to be stuck on this course. Not stuck stuck because I can’t complete it (though time is not on my side lately) but stuck because I’ve been so busy that I find making a simple card at the end of the day after the kids are in bed is a nice way to finish the day off & give me something to post about. Though I’m hoping to finish it soon – the AECP Clean & Simple Boutique Cards course.

Tonight I had a few minutes, and this new stamp set I have been looking forward to. I had to work on a 3D art product today for my digital art store so I forced myself NOT to open the package until I was done for the day. That was hard!

I really love “splatter” stamps – probably because I love splattered watercolor, so this artsy splattered/inked coffee set “Coffee with a Splash” by Altenew is fabulous! I did a very simple design with just a few items…

  • Coffee with a Splash set – Altenew
  • Splash of Color set – Altenew
  • Black Ink
  • Tattered Rose Distressed Ink
  • White Vertical Fold Card Stock
  • 3 Half Pearls
May your coffee be strong and your day be sweet…

I stamped the splatter in Tattered Rose, and stamped the coffee cup over it in black. I then stamped the sentiment under the coffee, and added 3 half pearls. That was it, super simple little design to brighten someone’s day! ❤️

Thanks for looking and…may your day be sweet too! ☕️

Life is Better With Friends & Karin Markers!

Life is Better With Friends & Karin Markers!

Today I had some work to do for my 3D shop (at Renderosity link in the menu) but afterwards I spent the afternoon FINALLY cleaning out my closet – wow – what a job that was. Honestly I just wanted to be at my art desk…but…I also wanted a clean bedroom closet! And it’s done! YAY!

I did have time to get a little crafty – que the Beastie Boys “She’s Crafty” – and I was able to finish painting this lovely succulent stamp from Altenew with the Karin Markers – which are amazing to work with! So JUICY! I just love them! Now onto the supplies…

  • Inked Flora Stamp Set – Altenew
  • Karin Markers
  • Distressed Oxide Ink
  • White Card Stock (vertical fold)
  • Rose Gold Polka Dot Card Stock
  • Leafy Background Stamp
  • Recycled Pink Ribbon
  • Black Ink
  • Micron Pen
  • White Gel Pen
  • Sentiment by Altenew
  • Foam Tape

The stamps by Altenew are of the top highest quality. I have to say, I have a lot of “off brand” and cheaper stamps – they can be fussy to work with. But the stamps by Altenew are amazing.

I colored the succulent with the Karin Markers using mostly just 1 color with a touch of aqua as well. I added detail back in with a micron pen & also added some white highlights. I cut the stamp out using the Brother Scan & Cut.

I then fiddled with the background and got a bit frustrated with the ribbon – ribbon frays 🙈 oh no! What to do? Tuck it under! So I ended up cutting a new card base & mounting the entire project onto the new base with foam tape. I absolutely hate to toss a project and waste materials, so I always always try to salvage it when at all possible.

Life is Better With Friends!

I set the succulent off center for more interest, and used the pink ribbon to hide the seam. I had to keep the background a bit simple so I only just barely stamped the leaves, giving it a muted grungy look, which is offset by the pretty foil rose gold polka dots paper on the left.

Sequins for a that extra flare!

Lastly I mounted the sentiment & 3 matching sparkly sequins in different hues.

All done!

I got a little bit frustrated with that pink ribbon but I made it work in the end.

Don’t you agree that life is better with friends? I love this little sentiment and tend to gravitate towards it when searching through my supplies!

I have to work tomorrow for my shop but I’ll try to find some “Crafty Time!” Take care and god bless!

AECP “Clean & Simple Boutique Cards” course practice (again!)

AECP “Clean & Simple Boutique Cards” course practice (again!)

I just love this course! Having a lot of fun making very simple cards with stamps on card base only! This is my latest attempt and I think so far it’s my favorite. I LOVE these colors – I’ve used them more than any other colors so far!

  • Altenew Crisp Dye Inks (“Sea Shore” set
  • Black Ink
  • Altenew “Enchanting Beauty” Stamp Set
  • White Card Stock
  • Cream Card Stock (insert)
  • Altenew Sentiments
  • Misti Stamp Tool

As stated the card is quite simple! I used the “Sea Shore” set of crisp dye inks to get a bit of an ombré effect on the stamps. I used my Misti Stamp Tool to stamp multiple impressions on both the top & bottom.

I then stamped the large sentiment “believe” but felt it needed more than just “believe” – so I added the second part of the sentiment. That was it! I cut & added a cream card stock insert with 2 rounded corners & stamped the back with my custom art stamp/name.

Simple, clean, and to the point – using only stamps/ink
A second closer view
…and the insert! All finished!

Thank you and enjoy your Sunday!